Official Luthiers Forum! http://www-.luthiersforum.com/forum/ |
|
Inlay questions - making the outline. http://www-.luthiersforum.com/forum/viewtopic.php?f=10102&t=11499 |
Page 1 of 1 |
Author: | Steve Saville [ Tue Apr 03, 2007 2:53 pm ] |
Post subject: | |
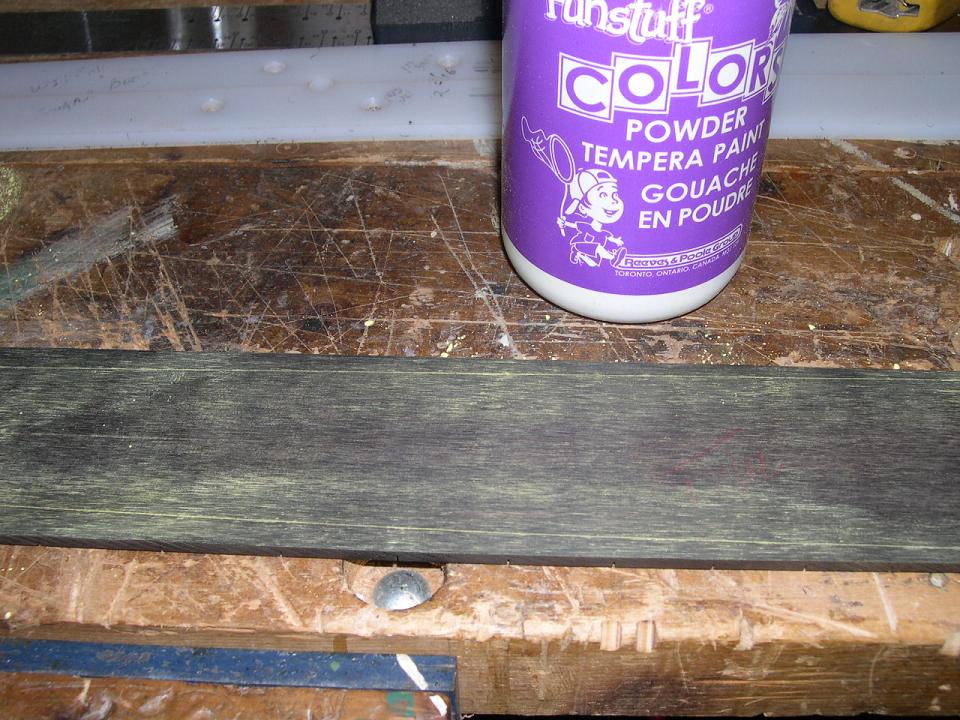
I'm going to be starting on the fretboard pictured below. The fretboard I'm using is figure rosewood, not black ebony. Any amount of over cut will be visible. I'm not real happy with the way I transfer the pattern to the fretboard and I'm wondering what you guys do. 
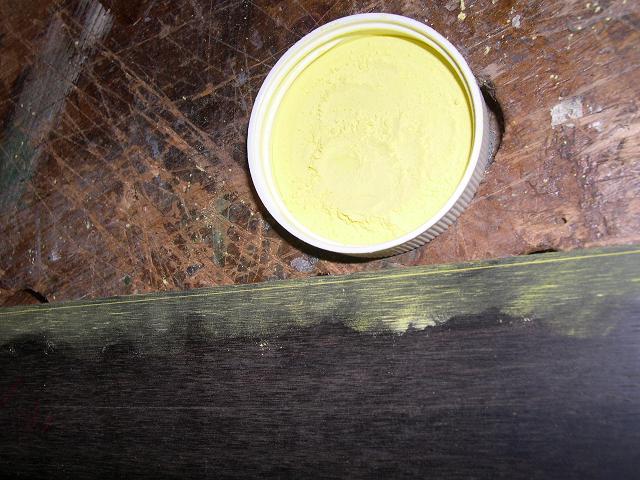
I stick the inlay on with some water-based white paint, allow it to dry, and then make the outline will a needle or a new #11 Exacto knife. Often the paint is too thick and caused my scribe line to be too large or the scribe lines aren't that visible. Any help is greatly appreciated! Thanks! ![]() |
Author: | KenH [ Tue Apr 03, 2007 2:59 pm ] |
Post subject: | |
I have had great luck using this method, but youre in trouble if the stuck on pattern slips for any reason. |
Author: | Michael Lloyd [ Tue Apr 03, 2007 3:15 pm ] |
Post subject: | |
Hi Steve, I glue the inlay on with airplane glue then trace with an Exacto knife. Once traced I remove the inlay, remove remaining glue and dust with Tempera paint power. The power highlights the trace lines as seen in the photos below. I didn't have one with the inlay traced. |
Author: | Anthony Z [ Tue Apr 03, 2007 4:02 pm ] |
Post subject: | |
Or you could photo copy the inlay patterns. Cut around the individual photo copies pieces and glue them to the fretboard. |
Author: | Louis Freilicher [ Tue Apr 03, 2007 4:22 pm ] |
Post subject: | |
For a super tight fit I would print the pattern slightly reduced in size, say 95% or so. You will have to experiment a bit but the idea is to make the outside edge of the printed pattern line up with the edge of the cut pearl. Do you cut to the left of the line? To the right? Or split it down the middle? No matter how careful you are there will be some gaps, try some experiments with CA and various wood dusts to find the best match. Louis |
Author: | sharp_custom [ Wed Apr 04, 2007 12:37 am ] |
Post subject: | |
Hi Steve: I do the same thing Michael does except that I rub a peice of chalk over the scribed lines. It produces the same effect though. Then, route until the chalk line just disappears and you're done. |
Author: | sharp_custom [ Wed Apr 04, 2007 12:45 am ] |
Post subject: | |
Steve: Where did you get those inlays? They're really nice! ![]() |
Author: | Wayne Clark [ Wed Apr 04, 2007 1:08 am ] |
Post subject: | |
I also use model airplane glue to stick the pieces to the wood. I use an exacto-knife with a fresh blade to score around each piece. A drop of acetone softens the glue enough so you can pop the piece off with your finger. Rub chalk on the scribed line so you can see them. The key for me is a good light source when I route the cavity. A magnifier seems to help as well. |
Author: | Kim [ Wed Apr 04, 2007 1:17 am ] |
Post subject: | |
Same as Don and Wayne but I have sharpened a small jewelers screwdriver into a slow tapering fine needle point and I use that to scribe around the glued shell and then rub chalk on the scribe line to define once the shell has been freed with acetone. Cheers Kim |
Author: | Steve Saville [ Wed Apr 04, 2007 2:06 am ] |
Post subject: | |
[QUOTE=sharp_custom] Steve: Where did you get those inlays? They're really nice! ![]() |
Author: | Steve Saville [ Wed Apr 04, 2007 2:10 am ] |
Post subject: | |
Thank you all for the tips. I think I'll go for gluing a photocopy down and routing to that. |
Author: | Ziegenfuss [ Wed Apr 04, 2007 2:22 am ] |
Post subject: | |
Steve, I have had the best luck using printed patterns. When I cut and dress the pearl, I assure that it is perfect to the pattern, so the pattern works as a solid outline. With my limited experience and tools, I have found that chalk lines can be harder to see than a printed and glued-on pattern - but a pattern is dependent on how well the pearl fits the pattern... Awesome |
Author: | sharp_custom [ Wed Apr 04, 2007 2:50 am ] |
Post subject: | |
[QUOTE=SteveS] [QUOTE=sharp_custom] Steve: Where did you get those inlays? They're really nice! ![]() Are they a special order? I didn't see them on the website. I could hav emissed them though. Thanks, Don |
Author: | JohnAbercrombie [ Wed Apr 04, 2007 3:19 am ] |
Post subject: | |
I've only done one guitar with a lot of inlay (cut the inlays from shell, etc... decided it was not my thing) but I found that the 'scribing' around the glued-on inlay worked best if it was quite deep- several trips with a very sharp blade (scalpel/x-acto or violin knife). If you have a good deep scribe, last bit of wood will just 'pop out' when you get close with the Dremel. Of course, I wasn't brave enough to inlay into rosewood- ebony is very kind and allows hiding mistakes quite well! John |
Author: | D Stewart [ Wed Apr 04, 2007 4:04 am ] |
Post subject: | |
Hey Don, I too checked the web page for them. I found them under the individual pieces catagory, several pages down. (there are about 30 "pages" of the different pieces. |
Author: | 1bordeaux [ Thu Apr 05, 2007 11:35 am ] |
Post subject: | |
I use a different approach. I use a silver metallic pencil. 1st I sharpen it, then I "shave" half the width of the lead away with a single edge blade. I use either finger tips or the ends of needle files to hold the cut shell in place, and then trace. The silver pencil works great on darker woods. Obviously if you don't have a steady hand, glue may be your best choice. On really delicate pieces, such as small signatures, I sometimes use kid's glue stick to attach a pattern to the wood and route through it. Once you make a single pass, you can remove the remains of the paper, place the shell on the route and mark reference points to cut to fit. Good luck! Paul |
Author: | SniderMike [ Thu Apr 05, 2007 1:07 pm ] |
Post subject: | |
Paul, where does one obtain this "silver metallic pencil"? |
Page 1 of 1 | All times are UTC - 5 hours |
Powered by phpBB® Forum Software © phpBB Group http://www.phpbb.com/ |